Divyesh Prajapati
-
Posts
184 -
Joined
-
Last visited
-
Days Won
1
7 Followers


Recent Profile Visitors
10,832,677 profile views


Divyesh Prajapati's Achievements
")


-
Hello; Let me know if I can help you
-
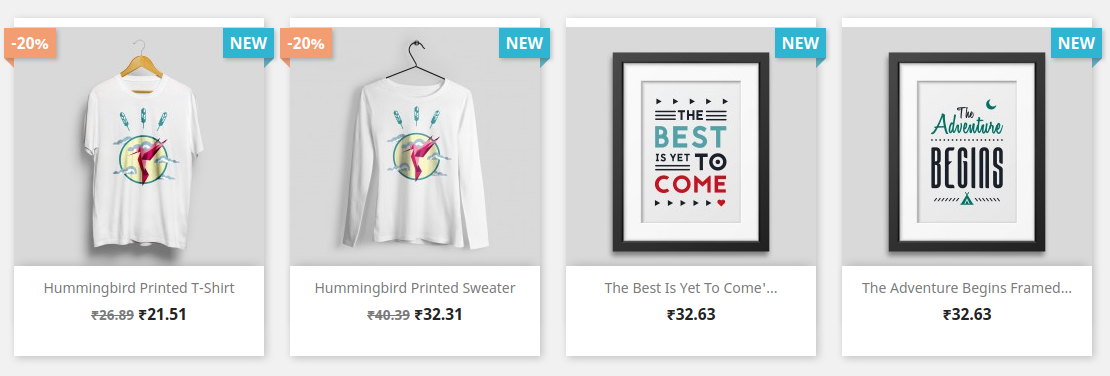
 This will work I guess; put this in file themes/classic/assets/css/custom.css li.product-flag.new { position: absolute; right: -10px; } li.product-flag.new::after { position: absolute; z-index: -1; content: ''; display: block; border: 5px solid #5fa9b9; transform: rotate(90deg); right: 0px; top: 30px; border-top-color: transparent; border-right-color: transparent; } li.product-flag.discount { position: absolute; left: -10px; } li.product-flag.discount::after { position: absolute; z-index: -1; content: ''; display: block; border: 5px solid #ea9c74; transform: rotate(180deg); left: 0px; top: 30px; border-top-color: transparent; border-right-color: transparent; }
-
You are using Prestashop 1.7 and in product listing page what are changes you want to make? One thing that I can see is product name is in uppercase... What other things you want to do?
-
Oh... The changes I have suggested is for 1.6
-
[Gelöst] Thumbnail auf mobiler Version geht nicht mit
Divyesh Prajapati replied to Selma's topic in Generelle Fragen
I guess to mark topic as resolved you need to add [Resolved] in German language in title of this topic.. Thanks -
[Gelöst] Thumbnail auf mobiler Version geht nicht mit
Divyesh Prajapati replied to Selma's topic in Generelle Fragen
You can mark this post resolved by adding [Resolved] -
[Gelöst] Thumbnail auf mobiler Version geht nicht mit
Divyesh Prajapati replied to Selma's topic in Generelle Fragen
That's great Enjoy -
[Gelöst] Thumbnail auf mobiler Version geht nicht mit
Divyesh Prajapati replied to Selma's topic in Generelle Fragen
You can add below code in you javascript file: /themes/alexa/assets/js/custom.js $(document).on('click', '.scroll-box-arrows .material-icons', function(e) { if ($(window).width() < 768) { setTimeout(function() { var imgSrc = $('.product-images li:first-child img').attr('data-image-large-src'); $('img.js-qv-product-cover').attr('src', imgSrc); }, 700); } }); This will change large images also. -
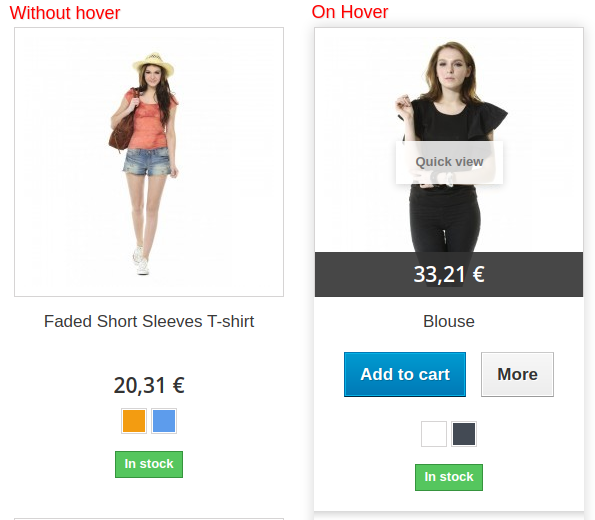
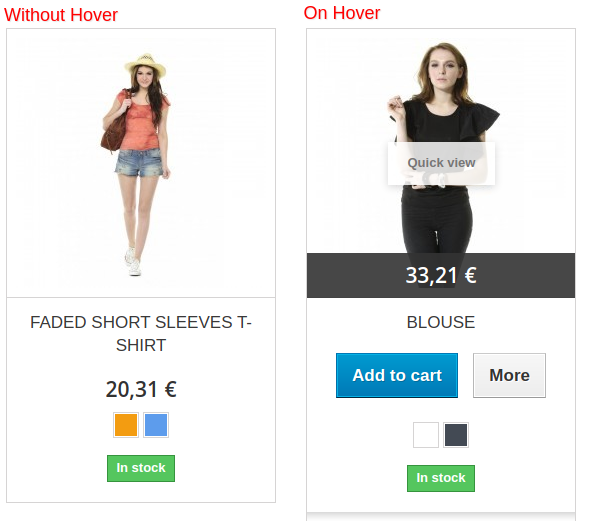
I guess you are using Prestashop v 1.6 and you would like add borders all around without hover on product... Based on that assumptions you can achieve this by modifying css themes/default-bootstrap/css/product_list.css. Make following edits in above mentioned css file. /* Approx line# 4 : to show product name in upper case letter */ ul.product_list .product-name { display: inline-block; width: 100%; overflow: hidden; text-transform: uppercase; } /* Approx line#164 */ ul.product_list.grid > li .product-container { background: #fff; padding: 0; position: relative; border: 1px solid #d6d4d4; } /* Approx line#170 */ ul.product_list.grid > li .product-container .product-image-container { border-bottom: 1px solid #d6d4d4; padding: 9px; margin-bottom: 13px; position: relative; } /* Approx line#235 ; if you want to remove shadow */ ul.product_list.grid > li.hovered .product-container { -moz-box-shadow: none; -webkit-box-shadow: none; box-shadow: none; position: relative; z-index: 10; } /* Approx line#222 ; if you want to remove shadow*/ ul.product_list.grid > li .product-container .functional-buttons { background: none; padding: 11px 0 5px; border-top: 1px solid #ccc; } After doing css changes; you can have results like attached images. I have shown both before and after images.
-
Oh that's good!!!
-
I guess there is not any free version for facebook pixel module... If there was any free module available than it will be tracking only base event that is PageView which is provided with base code of facebook pixel. Paid modules lets you track different kind of events apart from PageView... Like AddToCart, Purchase etc...
-
Great
-
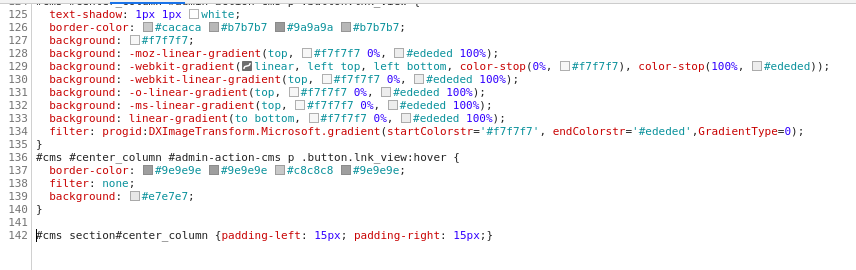
You don't have to change anything in existing things you have.... just add belows lines at the end and save it... #cms section#center_column {padding-left: 15px; padding-right: 15px;}
-
Hello @ Femme Lily Open /themes/leo_vanis_fashion/css/cms.css and add below css into it ... That's it !!! #cms section#center_column {padding-left: 15px; padding-right: 15px;} after applying above css this is the result ...
-
Click on Image or feature etc... I can add images and features...everything is working fine..