
How to Install PrestaShop: Complete Step-by-Step Guide (For Beginners)
If you are searching on how to install PrestaShop, you came to the right place. With millions of downloads and thousands of stores, installation tutorials are always requested. Thankfully, there are tons of resources online to help you install PrestaShop. You can install via a one-click installers provided by your hosting provider or you can install it manually via MySQL and FTP. Lastly, you can install a localhost version of PrestaShop on your personal device for testing or development purposes. In this article, we will provide a comprehensive guide on how to install PrestaShop.
There are mainly 3 ways to install PrestaShop:
1. Manual installation via MySQL and FTP: If you are comfortable working with MySQL and FTP, you can install PrestaShop manually. This process will require some basic technical skills, such as creating a database and uploading files to your server via FTP. We’ll of course provide detailed steps for both of these processes below in the guide.
This manual installation method will be covered in “Guide 1” of this article.
2. One-click installation with hosting provider: If you have a hosting account that provides PrestaShop installation scripts, this is the easiest way to install PrestaShop. Simply search your host’s documentation or contact their support team for instructions on how to install using the one-click script. Softaculous is the most famous auto installer, and this is also the one we will cover in this guide.
If you cannot see one-click installers on your hosting panel, contact your hosting support for help. If you’re on dedicated hosting, it’s not always the case that you have such packages on your server, whereas shared hosting usually do have one-click installers available.
This one-click installation method will be covered in “Guide 2” of this article.
3. Localhost installation: A localhost installation is one that is installed on your personal device, not a hosted server. Localhost installations are great for testing or development purposes because they don’t require you to pay for hosting services. You can create a local installation using MAMP, WAMP, Laragon, EasyPHP, or XAMPP. We won’t go into details on the localhost installation, as this has already been covered in a technical guide from PrestaShop devdocs. We recommend you to use Laragon in any case.
If you don’t know how to do this, contact your hosting support for help.
Guide 1: Manual PrestaShop installation via MySQL and FTP
Whatever version of PrestaShop you want to install, the installation process works the same way. In this guide we will be covering the installation of the latest version of PrestaShop as of today, PrestaShop [prestashop_last_version:latest_stable_version_number].
Before installing, make sure your server has the right configuration requirements. In most cases, it will work perfectly fine. You can see the requirements here. If in doubt, send the requirements to your hosting provider, and ask them if they support the requirements.
Step 1: Download PrestaShop
To begin the PrestaShop installation process, download the latest version from PrestaShops website. This will give you a .zip file that contains all of the necessary files.
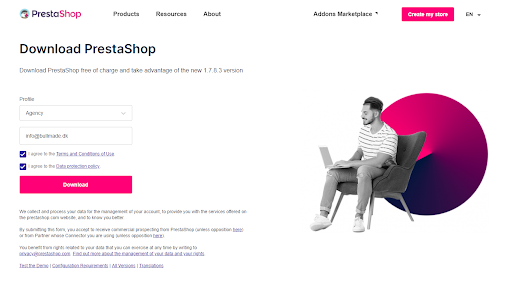
When you click “Download”, you will get the latest version of PrestaShop. If for some reason, you want to install a lower version of PrestaShop, you can click on the link “All versions” to see the other versions of PrestaShop.
Step 2: Uploading the files on your server
Next, unzip this file on your computer desktop or another local folder where you keep files while working on them (keep track of where it is). Once you open the folder that you downloaded from prestashop.com, the content will look like this.

Here you have two options:
- Unzip files before you upload it to your server
- Keep the file zipped, and upload the zip file to your server. This will work fine if you have access to a controlpanel, where you can unzip the zipfile from a file manager.
Step 2.a: Uploading the zip file to the server, and unzipping from a File Manager
The first option is to simply drag the prestashop.zip file into your server. You will need to have a FTP for your server. You can use FileZilla as a FTP program. Most likely, your root folder is called “public_html”, and you should upload the prestashop.zip file in there.
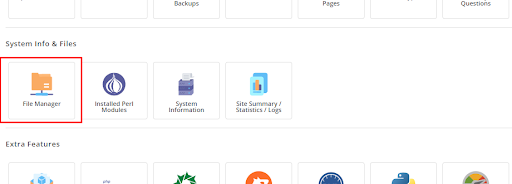
After you have uploaded the zip file to your server, if you have a control panel, such as Directadmin or Cpanel, go to the control panel and enter the file manager.
For DirectAdmin; Click on “File Manager”
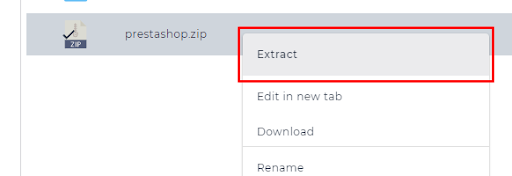
Double click on “public_html” folder, right click on “prestashop.zip” and click on “Extract”.
For Cpanel: Click on “File Manager”

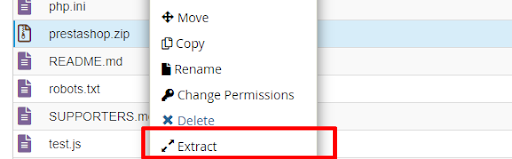
Double click on “public_html” folder, right click on “prestashop.zip” and click on “Extract”.
There are other control panels that may look different, or where you have to do it differently, but usually, they all work the same way.
Step 2.b: Unzipping the folder on your local computer, and then uploading the folder to your server
The second option is first unzipping the folder on your computer, and then uploading the folder to the server. After you unzip all the files, you can simply drag the “prestashop” folder into the public_html via FileZilla.

This process can take anywhere from 5 minutes to an hour (if not more), depending on your internet speed.
If you have a controlpanel, then we recommend you to perform step 1.b, as the unzip method from a controlpanel is a lot faster.
Step 3: Creating the database
Some hosting provider creates a database for you. Some don’t. If you already have a database created, then skip this step and go to Step 4, if not, then keep reading! Now we need to create a database on your control panel by performing following these steps:
cPanel: Login to your controlpanel. In this example we will do it with cPanel.
Under the Databases section, click on MySQL® Database Wizard.

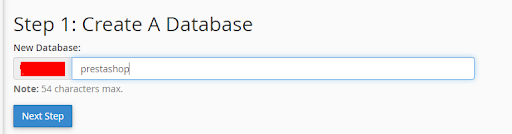
On the next page, enter a database name (We use “prestashop” but you can call it whatever you like), and then create your database username. Make sure you remember this password as you will need it later. Click on Create Database.
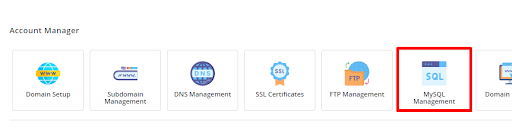
DirectAdmin: To do it DirectAdmin, click on MySQL Management.
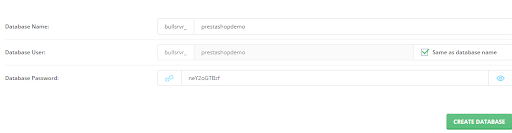
Then click “Create new database” on the top right corner, and enter a database name and generate a password. Then click “Create database”.
Now that we have our database created, we are going to continue with the PrestaShop installation.
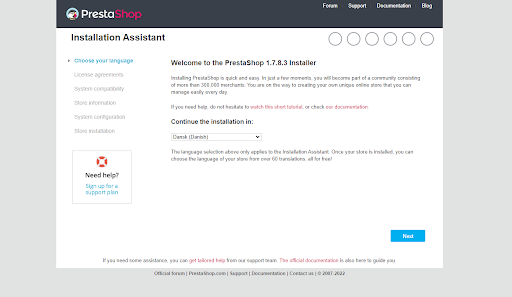
Step 4: Installing PrestaShop with the Installation Assistant
If you installed your files in the root as shown previously in Step 2 (both step 2.a and step 2.b), then you can access your installation by going to “yourdomain.com”. This will automatically open up the PrestaShop Installation Assistant.
In this guide, we are going to install PrestaShop for Luxkidz.
Step 4.1: Select Language
The first step is to select the language. This is not the language of your PrestaShop, but simply the language of the installation process. The Installer is available in most languages, in our case we are going to just select English. Press “Next”.
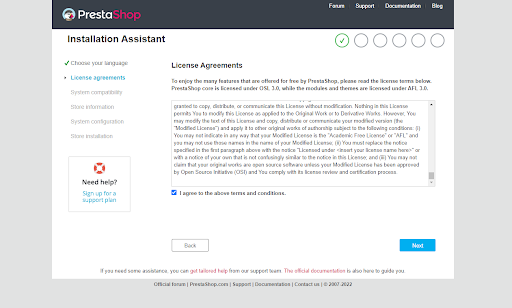
Step 4.2: Accept License Agreement
To continue the installation, please read the License Agreement, and if you agree, which hopefully you do, check the I agree to terms and conditions and click the “Next” button.
Step 4.3: System Compatibility
If your system is compatible with PrestaShop, this step will automatically be skipped, and you will be forwarded to step 4 (Store information), if there are any issues, you will be prompted on the exact issue. If in doubt, ask your hosting provider.
Step 4.4: Store information
In this step, you have to add information about your store. This is also the information that your PrestaShop store will be setup with, so make sure you fill out everything correctly. Everything can be changed later. You are also asked to select whether you want PrestaShop to install demo orders and demo products for you.

Shop name: Enter the name of your shop. This name will appear on the invoice, on the website, etc.
Main activity: Select the main activity for your store. This is only for statistical purposes, and is not mandatory. Skip it if you like.
Install demonstration data: Select “Yes” or “No” to whether you want demo products and demo data on your site. If it’s the first time you use PrestaShop, we recommend you to set it to Yes. Then you will see how an order, a product, a category etc. looks like.
Country: Select the main country of your store.
Enable SSL: If you have SSL enabled on your domain, set this to Yes. If not, set it to “No”.
The information below “Your Account” is used to create the main backoffice account of your store. You can always edit the information and add more accounts/users afterwards.
Step 4.5: Store information - Configure Database
You’re almost there! Now to the technical part. Remember in step 3 when you created a database? This is the information you have to use now.
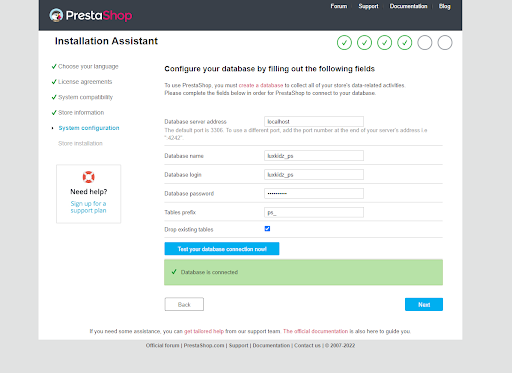
The database server address should be “localhost” unless another address is provided to you.
The database name and user is the ones that you created earlier, and likewise with the password.
Keep the table prefix to “ps_”, unless you already have a prestashop installation on the same database with the same prefix. In that case, you should also unselect the option “Drop existing table”. If it's a new installation, leave the options like they are, and press the button “Test your database connection now!”. If it worked, hurray! You are now one click of a button away from installing PrestaShop.
Hit the Next button and let's get rolling!
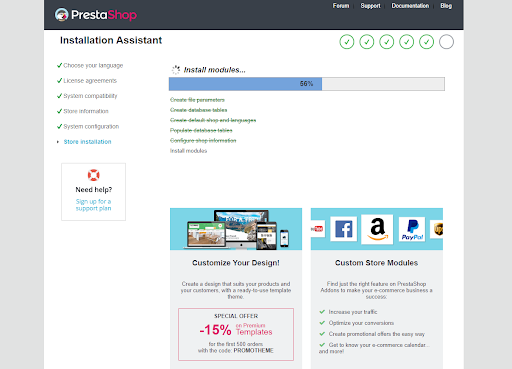
Step 4.6: Store installation
The installation process will usually not take more than 3-5 minutes. You’ll be able to follow the progress bar to see the status of the installation.
Once the installation finishes, you’ll see this screen with your back office information and a link to your back office.
Your PrestaShop store is now ready to use!
You can click on “Discover your store” to see how the frontend looks like, and “Manage your store” to enter your backend. When you click on “Manage your store”, you will be asked to remove the /install folder. You can remove that folder through the file manager (in Cpanel or DirectAdmin), or through the FTP with a FTP client like FileZilla.
Through Filezilla, simply right click on the /install folder and press “Delete”.
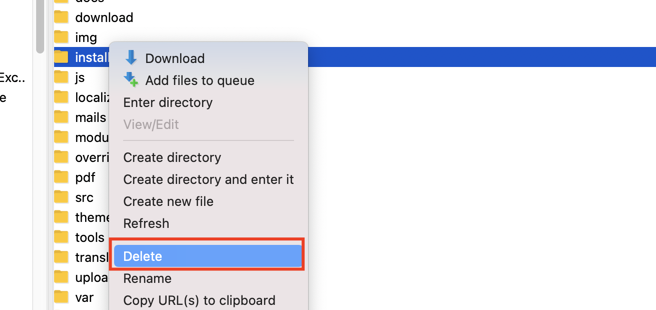
Deletion of the install folder will usually take 1-2 minutes.
After it’s deleted, go back to your back office and refresh the page. You will now see the login page where you can login to your freshly installed PrestaShop - yay!

Guide 2: One-click installation with hosting provider
The first guide covered the “manual” way to install PrestaShop. In this guide you will learn how to install PrestaShop with just a few clicks. As mentioned in the beginning, it requires your server to have a one-click installer, preferably Softaculous.
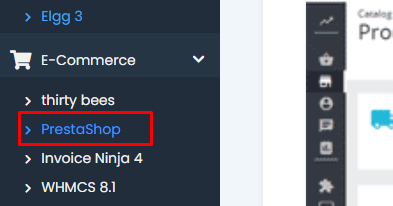
You can ask your hosting provider, or simply login to your hosting controlpanel and look for a 1-click installer. If you see “Softaculous Auto Installer”; click on it.

Select “E-commerce” from the menu and click on PrestaShop.
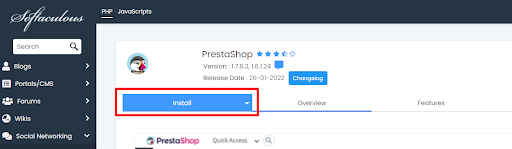
Click on the blue “Install” button above which will lead you to the quick install.
On the next screen, you can select the following options:
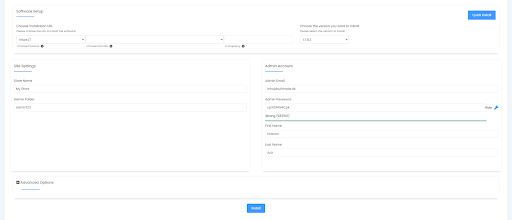
- Select the domain you want to install PrestaShop on.
- Choose the version you want to install
- Enter the Store name and admin folder (call it something that is not “admin” or “admin123”, but something that is not so accessible, like “psadminoffice” etc).
- Enter your account details.
And then hit the “Install” button.
That's it - Done! Everything has been installed for you, and you are ready to use the PrestaShop. This method is obviously much faster and easier than Guide 1, so use this guide if you have a 1-click installer available on your server. 99% of all shared hosting have it available, and if you’re on a different hosting plan, ask your hosting provider.
There you have it, now you know how to install PrestaShop virtually anywhere. If you have questions, the place to go would be our dedicated Forum for PrestaShop installation. Your community managers and moderators are active and ready to help out. Most of the issues you will encounter with installation are Server-side issues, usually permissions.
That’s why it’s best to go with a Hosting partner with PrestaShop. Installing PrestaShop is just the first step to turn your idea into a money making success online. Thanks for reading and be sure to leave your comments below.
FAQ about PrestaShop installation
Is it technical to install PrestaShop?
It can be a bit, if you don’t have technical knowledge, we recommend that you use a 1-click installer. Most hosting companies have 1-click installers, and you are unsure you can ask your hosting provider.
How do I install PrestaShop on my computer?
PrestaShop made a specific guide on how to install PrestaShop locally. You can find it here.
Is PrestaShop free?
Yes, PrestaShop is open-source and 100% free to install. You do however have to pay for hosting, but other than that, you are good to go with almost no costs by using PrestaShop.
You can improve your store by checking out PrestaShop Addons where you will find thousands of modules for PrestaShop.
Can I get help with installation?
Yes, if you are not sure on how to install, you can either ask your hosting company to help you install, or you can find a dedicated PrestaShop Expert who can help you.
For your own convenience, you can look out for a partner in your own country. This guide has been written by a PrestaShop Expert Agency, Bullmade (previously Bulldesign), and you can find us on the PrestaShop page here.
Is PrestaShop ready to use after installation?
You will need to setup your products, categories, payment method, shipping method etc. like with anything else. Most of the setups are quite easy, and once you install PrestaShop and log in for the first time, there is a guided tour that will help you with all that.
Can PrestaShop also be used for B2B?
Yes, that is absolutely possible. Some shop owners decide to run both their B2C and B2B on PrestaShop while others separate it and install one installation for B2C and another for B2B.
For instance, Nordic Maling, a large painting shop uses PrestaShop for their separate B2B shop. They use their B2B shop for their wholesale customers. They decided to separate it, to keep away the B2C promotion banners and offers from the B2B shop.
I have more questions
Look no further, check out the
where you can find lots of questions answered or simply open a topic and ask your questions there.


